Thursday, March 29, 2012

Lords of Scotland

Have you ever played the White Elephant Gift Exchange Game?   Every time, without fail, there is always one or two gifts that everyone is fighting.  It's usually because they come in pretty packaging and bows.  Hilariousness ensues as people steal that same gift, over and over, making one sigh as they lose their prize yet again.  The whole time you know that your horribly wrapped gift, will be the one sought after when the gifts are finally opened.  "Lords of Scotland" is a lot like that poorly wrapped gift.  While everyone is fighting over the new hotness, this little diamond in the rough is given no attention. When everyone sees its full potential it will be the game to own.
Goal of the Game

Players are trying to be first to acquire forty strength worth of supporters and claim the throne.  They do this by winning skirmishes against their rivals.

Components

"Lords of Scotland" comes with 98 clan cards, 1 Initiative Card, and one Rules Sheet. Each card contains the following information:  the cards strength, bloodline, rank, and power.  

Rank:  Each card represents a clan of Scotland.  Its unique rank is found in the upper right corner of the card (lower corner for Clan Makgill).  This rank is used to break ties.  The Clan MacDonnell card is rank 3, while the Clan Makgill card is rank 2.

Bloodline:  Each clan belongs to one of the eight normal bloodlines or to the royal Bruce bloodline.  The name of a clan's bloodline, the portrait of its chief, its clan tartan, badge and color are displayed on each card.

During the game, armies composed of two or more clan from the same bloodline fight at double strength.

Strength:  A clan's strength is listed in the upper left hand corner of the card. (Both clan cards above are strength 1.)  At the end of each skirmish, the army with the highest total strength wins the right to claim the first supporter.  During the skirmish, strength determines whether or not you can activate the clan's power.  A clan's strength value also represents its value when claimed as a supporter. 

Power:  There are nine different powers in the game corresponding to the eight normal bloodlines and the royal Bruce bloodline.  When you play a clan from your hand, and there is no clan already in the skirmish area, with a lower strength, you may activate the clan's special power.  For example, Clan McDonnell cards are not discarded and Clan Makgill cards allow the player to muster another clan.

When a clan is played face-up, their clan power may be activated.   Most effects happen immediately and require you to make a choice after you play the clam.  Some powers, on the other hand, only take effect at the end of a skirmish.  Once activated, these powers take effect even if another clan with a lower strength than yours if played afterwards.  However, the effect will only occur for you, if you control the clan at the end of the skirmish, and if the clan remains in play.  If, unfortunately, your clan belongs to another lord's army at the end of the skirmish, then its effect will occur for that lord instead.  Clans which are played face-down do not activate powers.

List of Clan Powers

Discard another clan:  discard one other clan in the skirmish
Swap with a Supporter:  switch this clan with one of the clans in the supporter pile
Swap with another Clan: switch this clan with another clan in the skirmish
Draw a Card: allows players to draw from the draw pile
Do not discard this Clan:  allows players to not discard the card at the end of the skirmish
Muster another Clan:  muster an additional clan immediately after this clan
Copy another Power:  copy the power of any face-up clan in this skirmish
Join each Bloodline:  This clan counts as the same bloodline as all other clans
Claim Two Supporters:  If you control this clan at the end of the skirmish, claim two clans in the supporter pile instead of one.  This power is not cumulative


Set-up

The oldest player is given the Victor's Initiative card. Shuffle the cards and deal each player five cards.  A draw pile is created with the remaining cards.

The top five cards from the draw pile are placed face down, side by side, to the right of the draw pile.  These cards are now the "Recruit Pile."


Cards equal to the number of players (2 for 2 players, 3 for 3 players) are placed face-up, side by side, horizontally, to the left of the draw pile.  These cards are now the "Supporter Pile."  If two supporters of the same number are put out discard both and draw again.

Space is needed for a discard pile next to the draw pile.  The lord with the Victor's Initiative goes first.


Game Play

Players gain support by winning skirmishes against their opponents.  A skirmish is five consecutive rounds of play.  During each skirmish, a player may either build up their army by playing cards from their hand or recruit clans to fight by drawing cards from the recruit pile.  At the end of five rounds, each lord gets to claim a supporter in order of highest strength army to lowest.  All mustered clans are discarded and a new skirmish is begun.

The player with the Victor's Initiative card goes first.  They first turn over one face-down card, in the recruit pile, before they take their action.

Recruit a Clan:  If a player has fewer than ten cards in hand, they may recruit a clan member.  The player may draw any card from the recruit pile.  If the card was face-up a replacement card is placed face-up as well.  If the card was face-down the replacement is placed face-down.

Muster a Clan:  A player may play a card to their area face-up or face-down to add it to their army, for the current skirmish.  If the card is placed face-up and there is no lower strength card than that card, the player may immediately activate the power described on the card.


After the player has recruited or mustered a clan and / or activated its power their turn is over and it is the next lord, in clock-wise order, turn.


The End of a Skirmish

At the end of each skirmish, flip over all face-down clans in the skirmish and total up the strength of all clans in each lord's army.  Double the total of any army, if the army contains more than one clan, and all clans in the army are from the same bloodline.  If your army has the highest total strength, you win the skirmish.

Collect one of the clans in the supporter pile, and set that card aside in your victory pile to keep track of how many points you have.  Then, in the order of the second highest value army to the lowest value army, each other lord claims a supporter and places it aside in their victory pile.


If there is ever a tie between two or more lords, the lord who controls the highest ranking clan in the skirmish wins the tie.  Once all clans in the supporter pile have been claimed, discard all the cards in the recruit pile and the cards which were mustered into the skirmish.  Then, replace the cards in both the supporter and recruit piles with new cards from the draw pile.


These will be arranged as they were at the beginning of the game.  If the draw pile runs out, reshuffle the discard pile.  The lord who won the skirmish is given the Victor's Initiative card and takes the first turn in the next skirmish.

The End of the Game

Continue taking turns and completing skirmishes until someone accumulates forty or more strength worth of supporters.  At that point, the lord with the most strength of support wins.  If two are more lords are tied, then the lord who placed higher in the final skirmish wins. 


My Thoughts

I admit, I'm guilty.  This game sat on my shelf for months because I could not get past the artwork.  When it finally got to the table I sat there, shaking my head, asking myself why I didn't play it sooner.  This is an amazingly fun, light, quick game.  There is a lot packed in to it.  With better graphics and "Lords of Scotland" would be a lot more must have lists.

Being a card game there is going to be a lot of luck involved.  There is also a lot of strategy and tension.  Since players can place cards face-up and face-down decisions can become quite a gamble.  Do you muster your best clans or put out a lower card so you can use its power or block opponents' powers?  Could your opponent have all one clan with those face down cards?

You can watch what clans your opponents recruits and try to guess their strategy but it isn't easy to determine.  At the same time you have to balance recruitment to make sure you don't run out of clans and get the clans that would work with your own strategy. 

Supporters also play a role in the strategy.  Sometimes numbers are close together and sometimes one card is much higher.  It seems like our supporters are always one of two numbers off of each other.  When supporter numbers are low or close players may not risk using their best cards or they may bluff and try to ensure a victory that skirmish. 

"Lords of Scotland" was a surprise game from me.  I was not expecting it, but I have found a wonderful little card game that I would highly recommend.  Game play is smooth, fast paced and captivating.  The rules are well written and easy to learn.  The quality is wonderful (love the linen-finish cards) if the artwork isn't.  If "Lords of Scotland" came out with another theme or different art I would definitely be per-ordering.


Quick Stats:

Designer:  Richard James
Artist:  Gabrielle Levion
Publisher: Evertide Games, Z-Mann Games
Number of Players: 2-5
Game Length:  35 minutes

Saturday, March 24, 2012

The First Sparks: A Review

Ten years ago the game "Power Grid" was introduced to the board gaming world.  As a celebration of its anniversary "First Sparks" was created.  The idea comes from the original name of Power Grid "Funkenschlag," or "flying sparks."  These sparks of fire take back in human history to the Stone Age.  Here players hunt and gather, gaining knowledge and strong tools.  They slowly expand their numbers vying to become the largest clan.

Object of the Game:

Players take the roll of clan leaders developing new hunting technologies and gaining knowledge.

As their skills grow, and their knowledge expands, clans are able to grow and spread to new hunting grounds.

The player to have the most clan members on the board, when at least one clan has reached thirteen members wins the game.


Components / Set-up

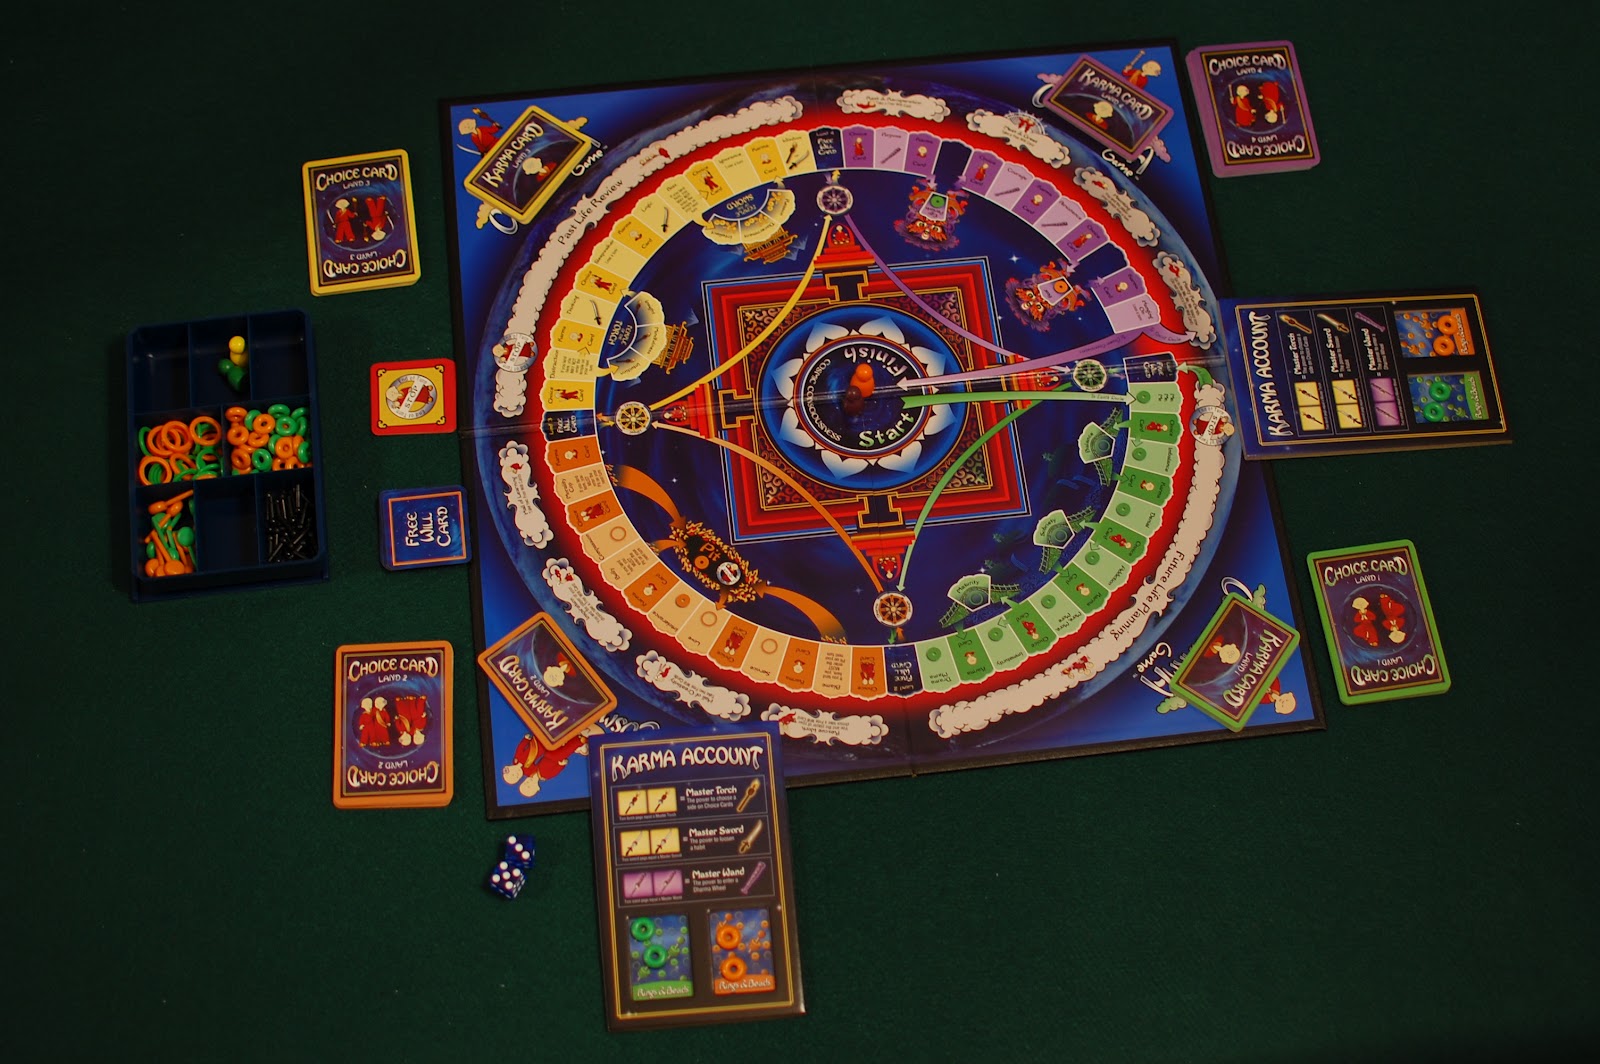
The artwork and the components for first sparks are what drew me in.  Yes, I'm a sucker for cute wooden meeples! I mean where else are you going to find a mammoth meeple?  And they don't disappoint.  All the components are of good quality. 

Each player is given 17 wooden clan members from the 102 green, red, blue, black, white or yellow clan members. They also take 7 food from the 98 wooden food tokens.  There are 18 green 1 value field crops, 12 yellow field crops, 18 purple berries (value 2), 20 blue fish (value 3), 18 bears (value 3), and 12 mammoths (value 4).  Players start with 1 green field crop and two yellow field crops.  Food tokens are always placed where all other players can see. 

Players will also take a food/ spreading clan overview card and a phase of the game turn overview card.  The game comes with six of each.  The overview card shows the different values of the food.  Food is equal to money and players can always exchange food tokens with the general supply when they need change.

Players then take the starting herb cards with the lowest numbers matching the number of players.  For example numbers 1-4 would be used with four players.  These cards are shuffled and one is given to each player.  The player with the highest number card places a clan member on space 1 of the player order track.  The other players follow in descending order based on the card numbers.


Next, players place one clan member on space 1 of the clan size track on the storage board.

All field crops, 4 berries, 2 fish, 3 bears, and 2 mammoths are placed on their correct spaces of the board.  These spaces represent the harvest.  The harvest pile of field crops is the only unlimited supply. The remaining food tokens are placed as a general supply next to the storage board.

Players now choose the correct number of landscape tiles for the number of players.  Choose three tiles for three players, four for four players, and five for five players.  The tiles are placed face down and shuffled.  In player order, players create the game board.  The first player draws a landscape tile and places it face up, in the middle of the table.  The next player draws a tile and places it adjacent to the first.  This continues until all tiles are placed.

Players next set up the food supply tiles.  The game comes with 12 (3 fish, 4 berries, 3 bears, and 2 mammoths.)  Which tile is placed, is dependent,  on the number of players, and the number of different hunting areas on the game board.  Each game round a number of food tokens are placed on the harvest spaces according to the table in the rule book. One additional food token is added for each matching hunting area of the game board.  Players calculate the total and then place the correct tile on the chart.


For example if there are four players and two areas for fishing on the game board a four fish tile would be placed.

Now players set up the technology cards.  07-14 are placed in two rows to represent the technology market.  Place cards 07-10, in increasing order (left to right), in the top row.  This represents the current market.  11-14 are placed in increasing order in the bottom row to show the future market.

The remaining cards are shuffled.  Depending on the players a certain number of technology cards will be removed.  (6 with 3 players, 3 with four players).


The shuffle card is placed on the bottom of the shuffled deck.  This deck is placed next to the technology market.

Landscape Tiles

The landscape tiles each have two hunting areas divided into 3 spaces.  The tile to the left shows one hunting area for bear and one for fish.

As the book says, players cannot hunt fish or berries.  for the purpose of ease, the word hunt is used.

Clans can hunt the different foods when they have both a member standing next to the matching hunting area and own 1 or more matching tools. 


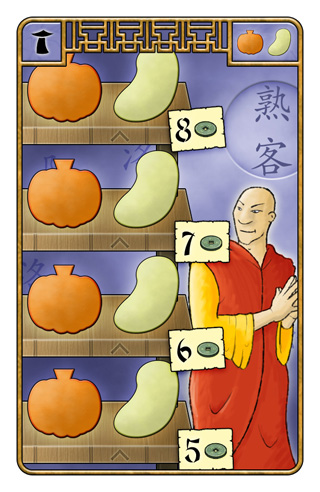
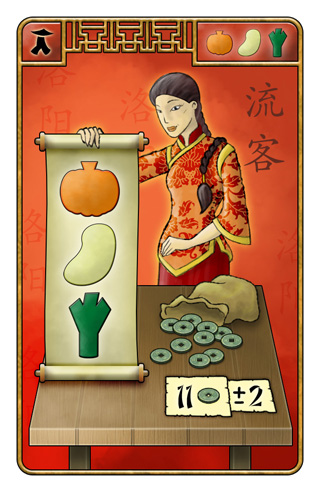
The Technology Cards

There are two types of technology cards, tools and knowledge.


 Tools allow clans to harvest food when hunting.  If a player owns the spear, and a clan member next to the mammoth hunting area, they are able to harvest mammoth.  Clans may own a maximum of three tool cards.  When they acquire a forth card, they choose one card and discard it from the game.

The starting herb card and field cards are considered tools.  Clans can own any combination of cards and even own several copies of each.

Knowledge cards help clans gain permanent advantages.  Besides tools, a clan can own any number of knowledge cards. 


Knowledge does not take up a tool space and can be hoarded in addition to tools.  A clan can have only one copy of each type of knowledge.   Knowledge cards are easy to tell apart from the tool cards.  Knowledge cards have a red border around the name advantage box.  Tool cards have a green border.

The number on the left of the technology cards represents the rank.  The number on the right over the food shows how much food is needed to buy the card.  The text on the card, explains the advantage of the knowledge.  With the knowledge of fire, clans do not need to discard spoiled food.


Game Play

To represent the clan's initial settlement of the board, the game starts with a short placement round.  After that there several game rounds consisting of four phases.

Initial Placement Round

In reverse player order, each clan must place one clan member on any one empty space of the game board.  Only one clan member can settle each hunting area this round.  This initial placement is free. 

Next, in player order, starting with the first player, each clan may voluntarily place a second clan member.  The clan places its second clan member on a space adjacent to the first.  Other clans can already be occupying the chosen space.  A space can be occupied by one member of each clan, up to the number of players in the game.  The costs for placing the second clan member are the same costs as shown on the Spreading the clan card. After each clan has placed a total of 1 or 2 clan members the correct number is marked on the clan size track. 

Determining the Player Order

Players now need to redetermine player order.  The player with the biggest clan is the new first player, followed by the other players in order of, descending clan size.  When there is a tie, the player with the highest numbered starting herbs card is ahead of the other tied player(s).

All Following Game Rounds

After the first placement round players will play several rounds of four phases.  Each phase is completed by all players before continuing on to the next phase.

1.  Buying new technology / discarding rotten food
2.  Going hunting / feeding clan
3.  Spreading the clan
4.  Bureaucracy

1.  Buying new technology / discarding rotten food:  Each clan can buy one technology card and at the end of the phase will discard any rotten food.

Buying a new technology:  A green field crop (value 1) is placed on the lowest-numbered card of the current technology market.  Whoever buys the card also receives the food.  In player order, starting with the first player, each player chooses a technology card and offers it for purchase.  On a player's turn he chooses to either pass or choose a technology card for purchase.


If the player chooses to pass they can not get a new technology card this round, even if other players later choose technology cards and offer them for purchase.

If the player doesn't pass they choose a technology card for purchase from the current marker and offer it.  In player order, the other players have one chance to buy the card.


The player furthest down in player order who want to buy the card, pays the printed cost with his food and places the card face up in his area.  If no other player wants to buy the card, the offering player must buy the card.  When a player takes the lowest-numbered card they also receive the field crop.  That crop can be used to pay for the technology.

New cards are immediately drawn to replace the sold cards.  The cards are also  rearranged so the the market is in ascending order (four lowest in the current market).  If a drawn card is lower than the card with field crop, the crop is removed and put back in general storage. 

When the shuffle card is drawn, it is placed in the highest stall of the market.  The remaining technology cards are reshuffled and placed as a new draw pile.

The phase is continued until all players have either bought or passed.  Each clan can only buy one card each round.  It may be helpful to either "tap" the newest card or flip the clan members on the turn order track when they buy a card to keep account of who has and hasn't bought or passed.


If the first layer takes his chosen card, the next player in player order takes his turn at offering a technology card.  If they have already purchased a card, the next player, in turn order, may offer a card.  When another player buys a card, the current offering player may again choose a new technology card to offer or pass.

Clans may only posses three tools at any time.  When they buy a fourth tool they must discard one of the tools back into the box.  There is no limit to the number of knowledge cards a clan may possess.

After all clans have purchased or passed on the technology cards and the lowest card (with the free field crop) is still in the market, remove the crop and place it back into the supply.  Discard this technology card and place it back into the game box.  Draw a replacement card and rearrange all technology cards, in the market, in ascending order.


Discarding rotten food:  All clans without the knowledge of fire must discard 1/3 of their food (rounded down) and place it back in the general supply.  A clan with fire keeps all their food.  They can also hide their food if they wish.

2.  Going hunting / feeding the clan: Clans go hunting during this phase by collecting food from the harvest spaces; if they have both the appropriate tool and stand next to the matching hunting area.  At the end of the phase, players must also feed their clan members on the game board.


Going Hunting: In reverse player order, beginning with the last player, the players go hunting.  On a players turn, they check to seethe  hunting areas his clan members are standing next to, and which matching tools his clan owns.  Only when the clan fulfills both criteria can they successfully hunt.  The clan can use one or more tools of the same type as long as they have clan members standing next to the matching area.  For the starting herbs card and the tool field card, the clan always harvests a secure amount of food, without needing to stand next to a hunting area. 

The clan checks each tool card for the amount of food it is allowed to harvest.  It takes the matching number of food as harvest from the harvest spaces on the storage board.  If a clan owns more than one tool card of the same food type, it can use all of them during the hunting phase.  Players choose the order of the tool cards to get the maximum harvest.  The player takes all food tokens for the first tool before checking the amount of food on the harvest space for the next tool of the same type. 


If a clan has members next to two or even three areas of the same type it can use the tools more effectively, and harvest more food.  When a clan takes food from the harvest spaces, just add 1 (or 2) additional virtual tokens to the number of food tokens when counting for the matching type.  There is not advantage for having several clan members standing next to the same hunting ground.

To help keep track of the tools being used it was helpful to either place the food on the card or move the cards up and down.


Feeding the Clan:  After a player's clan harvests they must now feed each clan member on the game board.  The food used to feed is placed back into the general storage.  The rules say it is rare, but if a player can not feed each clan member, the starving clan members are removed from the board.  The player may choose which members are removed, as long as the remaining clan members all stand on adjacent spaces as a group.  He must then adjust his number on the clan size track to show the new number of clans members. 


3.  Spreading the Clan:  In reverse player order, beginning with the last player, clans now spread on the game board to reach new hunting areas.  Each clan can have only one member on each space.  But, all clans can share a single space.  A player can place a new clan member on any adjacent space and can use newly placed clan members as neighbors.


On a player's turn they pay a base cost for new clan members. They pay 1 food for one member, 3 food for 2 members, 6 food for 3 members, 10 food for 4 members, and 15 food for 5.

Additional food may be paid if they move across a mountain and if the place members on a space with opponents clan members.  It costs plus one food when crossing a mountain.  When a new member is placed in a space including with one or more opponents he pay +X food where X is the total number of clan members, including his own.  For example they would pay +2 food for being second, and +3 food for being third.


When new clan members are placed it may be wise to place them on their sides.  They can be placed upright after calculating the costs.  Players can place a maximum of five members each turn.  After members are placed, players adjust his clan member on the clan size track. 


If you are planning on buying a technology card during the next round it may be wise to not use all your food!  


4.  Bureaucracy:  During this phase, players determine player order, refill the food supply on the harvest spaces, and remove the highest-numbered technology card from the technology market.

Determining the player order:  The player with the largest clan in the first player.  The other players follow in decreasing order.  In case of a tie, the player wit the highest technology card is first.

Refill the food supply:  How much food is refilled depends on the number of players and the number of hunting areas on the game board.

First fill the harvest spaces according to the number of players.


For berries, 2 are placed for 2 players, 3 for 3 players, 4 for 4 players, 5 for 5, and 6 for 6.  For fish, 1 is placed for 2 players, 2 for 3, 2 for 4, 3 for 5, and 4 for six.  For bears, 0 are placed for 2 players, 1 for 3, 1 for 4, 2 for 5, and 3 for 6.  For mammoths, 0 are placed for 2 players and 1 for every other number of players.


Additionally, players refill 1 additional food for each hunting area of the game board.  For an easy overview the matching food supply markers should be placed on the harvest spaces at the start of the game.


Adjust Technology Market:  Remove the highest numbered technology card from the future market and put it face-down on the bottom of the draw pile.  Draw a replacement card and place it in the market.  If necessary, rearrange the cards in ascending order: the four lowest in the current market and the four highest in the future market.


When the shuffle card is drawn, place it as the highest card in the market, shuffle the remaining cards, and place them as the new draw pile.  When the shuffle card is the highest card in the market the game changes.  The shuffle card and the lowest card is the market are removed and placed back in the game box.  The whole technology market is reduced to a total of six technology cards.  From now on, players can choose from all six cards during phase 1 and the highest card is not placed below the draw deck for the remaining rounds.

After adjusting the technology market players start a new round with phase 1.


Game End

As soon as one clan has placed its 13th clan member on the game board, players finish the current phase 3 so that all players, can finish their turns.  Of course a player is allowed to place more than 13 clan members, as long as they can pay.  The game ends now.

The player with the most clan members wins the game.  In case of a tie, the player with the most food remaining is the winner.


Changes for 2 Players


I have only played this game with two players.  The few modification need are easy so it works well as a two player game.  I don't mind the neutral player at all, as long as we remember to place him!

All the rules apply with a few changes.  First, a third neutral clan spreads on the game board and more technology cards are removed from the market.

Preparation:  To determine player order the neutral clan is ignored.  The game board is created with three tiles.  The first player places the first two landscape tiles and the second player the third.

Technology cards: 10, 11, 15, 20, 24, 26, 33, and 39 are placed back in the box.  There are also only 6 cards in the technology market.  After the starting market is created 2 cards are randomly removed and placed back in the box.  The shuffle card is then placed at the bottom of the stack.  The neutral clan members are placed to the side and one is placed on space 1 of the clan track. 

Playing the game:  (Placement Round) The second player places 1 clan member of the neutral clan on any empty space.  Afterwards, both player place 1 or 2 clan members according to the normal placement rules.  Adjust both the clan size track and the player order at the end of the placement round.

(All Following Rounds)  When buying a technology card the first player does not need to buy his first chosen technology card.  If the second player declines his option to buy the card, the first player can decide to discard this card instead of buying it  They must buy the second card they choose if it is also declined. 


When spreading the clan the second player begins by placing clan members of the neutral clan before he places his own.  He must place as many new, neutral clan members, until the neutral clan size equals the first player's clan size.  The neutral clan members must follow all normal placement rules, but do not pay.  After the neutral clan is placed, both players place clan members.


When players remove the shuffle card together with the lowest technology card the market is reduced to 4 cards.


My Thoughts

I have never played "Power Grid" and cannot compare "First Sparks" to it.  This can be seen as a disadvantage and an advantage.  I'm not expecting "First Sparks" to be like "Power Grid." I have no preconceived ideas of what it should or should not be.  But I also can't compare the mechanics and game play.  "First Sparks" shall stand on its own.


The rules for "First Sparks" were a bit confusing at times.


For example, making you refer to charts on later pages forcing you to skip ahead or wait to clear a up a rule later.  It may also be a bit of a hassle trying to remember if a phase is done in reverse player order or in player order.

Actually setting up and playing the game made it a lot easier to understand.  This is true in many games; you just play it, and it makes sense.  After the first game, set-up and playing was much smoother.

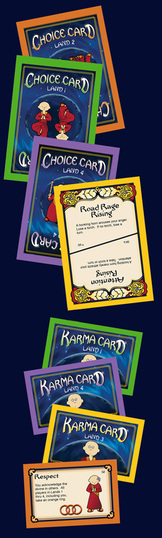
As I said, what drew me in, was the components (sucker for cute wooden meeples).  They are well made and I the artwork is nice.  The cards are funny, the pictures make me laugh.  The storage board and landscape tiles are more serious and the like the combination.  I also never thought I would be drawn to the caveman theme but I keep adding more and more games, with this theme, to my collection. 

One component that I brushed off the first time I saw it, has actually become a fun addition to the after-game. The achievement sheet keeps track of different achievements reached during the game:  when your color wins, ties, the first game played each year, winning without mammoths, and so forth.

I am not one to keep extensive records of the games, but it is fun to fill out the sheet. After each game we check to see what, if any, achievements we have reached.  A few years from now, it may be fun to reminisce about the first game played in 2012.

I would classify "First Sparks" as a medium-weight, medium length game.  Most games have been around an hour.  This length, and easy set up, makes it a likely candidate for a week night game.  Players who get stuck trying to calculate moves, and pull off the perfect turn, may lengthen the game and get stuck in analysis paralysis.  

I found myself really enjoying this game.  I like the combination of tension and humor.  Tension from understanding how to gathering enough food to feed and spread the clan, while still having enough food left over to buy technology cards.  And then laughing at the artwork of cavemen running away from the mammoth.  The game just makes me smile.  "First Sparks" may slowly be creeping up into my top 10.


Quick Stats:

Designer:  Friedemann Friese
Artist:  Lars-Arne "Maura" Kalusky
Publisher:  2F-Spiele, 999 Games, Edge Entertainment, Rio Grande Games
Number of Players: 2-6
Game Length:  60 minutes

Tuesday, March 20, 2012

Cosmic Karma: A Review

"Change your karma, change your life."

Do the small choices we make everyday really matter?  Do I hold the door open for the young mother, struggling with her groceries and small child, or  walk by pretending I don't see her?  Does this simple choice really affect the kind of person I am?  Does it bring about a consequence for myself later?  Do I have the ability to change myself? 

These questions and others are answered in the new game "Cosmic Karma"


Objective of the Game:

Players are trying to be the first to acquire all three master tools (torch, sword, and wand), remove all of their negative karma, and return to Cosmic Consciousness.  The first player able to do so will win the game.


Components / Set-up:

The first thing you notice about this game is the quality of the components; from the box to the pawns.  The box is a linen finish and even has two finger pulls on the side, which are very  convenient when removing the lid.  The insert is very functional.  I won't be throwing this one out.  Each item has its own secure place and everything fits in the box perfectly.  The plastic components and the pawns even come in a plastic tray; no Plano Box needed here.  It is easy to see that a lot of time and effort went into this design.

The cards are also a good quality.  The game comes with Choice Cards, Karma Cards, Free Will Cards, and Lose a Turn Cards.  Players first set up the Choice Cards.  There are four colors of cards:  green, orange, yellow, and purple.

Each corresponds to the land of the same color.  These are placed text-side down near their land.  The Karma cards (four colors) are also placed near their correct land.

Free Will Cards and Lose a Turn Cards should be placed to the side of the board.

One player is chosen to manage the bank.  The bank holds the orange and green rings, beads, and habit sticks.  Beads represent negative karma and rings positive karma.  When a player receives three beads of the same color, this represents a habit.  The three beads are placed on a stick of the same color.  No more than three beads may be placed on one habit stick.

Beads placed on a stick become harder to discard, as compared to the loose beads. Habits can only be loosened with a Master Sword and only while in the Temple of the Sword.  Same color rings and beads are matched together and returned to the bank as soon as they are acquired. 


Each player is given a Karma Account Card.  This card has an indented space for the rings, beads, and habit sticks on the bottom.  The three tools of the game also have a space on the Account.  Once a player gains one of the tools they place a peg to represent this.  Two pegs equal a master tool, which cannot be lost.


Each player selects a pawn and places it in the center of the game board.  The first player is determined by a dice roll.  Whoever rolls the highest goes first.  The first player rolls the dice and moves that many spaces.  The "Me, Me, Me" space in Land 1 (Green) is the first space counted.  Players move clockwise in the Earth Realm and counter-clockwise in the Spirit Realm.

The Tools


Torches represent intuitive knowing. A Master Torch allows the player to select the best option on a choice card. When they player has a Master Torch, and they land on a choice space they may choose which side to use.


Swords represent rational thinking. A Master Sword allows the player to loosen a habit. when the player has a master sword and lands on one of the spaces in the Temple of the Sword (Land 3), he removes a bead from one habit stick and returns the bead and the stick to the bank. He will still have two beads from this habit.

Wands represent action and direction. A Master Wand allows players to enter the Dharma Wheel. He does so by passing over the adjoining Free Will Cards space. He may continue onto any as many Dharma Wheels as he wishes on this and subsequent turns. He exits the wheel on the Free Wheel card space of his choice and then continues in that land.


The Board

The board is really beautiful and very meaningful.  It is set up as a mandala representing three realms: The Earth realm, the Spirit Realm, and Cosmic Consciousness.


Earth Realm

In the Earth Realm the player takes on a physical body.  This realm represents the duality where both good and evil exist.  Divided into four lands; it is also the only realm where players can gain karma. 

Land 1 represents "The Self."  Here players move and make choices that deal with balance, sobriety, and maturity.  The goal is to become grounded and self-disciplined.  The bridges of Land 1 represent the dual qualities of self.  The quality on the bridge is positive while the quality on the opposite square is negative. 

Land 2 represents "Others."  Here players are trying to form healthy relationships with others.  Choices here deal with empathy, fairness, and compassion.  Land 2 is also where players may encounter the Pit.  Players may be sent to the Pit through the bully and morality cop squares.  Because it represents turmoil and unhealthy relationships, the square of love leads the way out of the Pit.

Land 3 represents: "Knowing." Players are trying to gain knowledge and awareness.  This land yields tools that represent intuitive knowing (inspiration, receptiveness) and rational knowing (reason, logic).  The temples represent these two types of knowing.  The Temple of the Torch is the primary place to gain torches.  Going here shows the importance of inner work and the square of distraction blocks the entrance.  The Temple of the Sword represents rational thinking and is the only place to break a habit.  The square of bias blocks entrance into the Temple.

Land 4 represents: "Doing."  Here players are tying to get a tool (wand), that represents skilful action, prioritization, persistence, and self-actualization.  The Demons in Land 4 represent the Tibetan Mara, or the obstructor to spiritual progress.

One demon gives players a green bead for ego, or imbalance of self.  The second demon gives players an orange bead for fear, or lack of love for others.  One may wonder why these are found at the end of trip of the Earth Realm.  The demons show us that it is possible to relapse in our journey at any time.

Spirit Realm

After a loop around the Earth Realm a player enters the Spirit Realm.  This is where players travel between physical lives and experiences here happens while a player is out of his physical body.  The player is not necessary "spiritual" while he is in the Spirit Realm.  Here players will encounter spaces such as "Rest & Relaxation," "Past Life Review,"  and the "Hall of Creativity."

Cosmic Consciousness

The circle in the center of the board that is both the starting and ending point is Cosmic Consciousness.  This section of the board represents the concepts of the unknown, the unknowable, the All, sources, and universal energy. 

The Cards

Choice Cards: A choice card is drawn when a player lands on a Choice Card space.  The player draws a card representing the land they are in; his choice is the side that appears right-side up or the readable side.  A Master Torch allows a player to choose.  After doing whatever the card says it is returned to the bottom of the pile. The cards represent two possible scenarios and reflect the duality of the Earth Realm.  Most of the scenarios are ordinary situations to show us that karma is small. 

These cards are very creative.  My favorite was when my husband unexpectedly read the "Brick in the Head" card.  It said that:  someone pulls you out of your truck and smashes you in the head with a brick.  You forgive him.  Take an orange ring.  I know it wasn't supposed to be funny but I was not expected a card like that.  After the brief shock wore off, I paused for a moment, and thought to myself, could I really do that?  Could I forgive someone after they did something like that to me or someone I loved?  Could you?

Karma Cards:  A player receives a Karma Card when they land on the Karma Card space.  After following the directions it is returned to the bottom of the pack.  These cards represent to use the complexities of karma.  They could give players an extra turn, enable them to travel to another land, interact with another player, or even receive a bead. 


Free Will Cards:  Here is where we take a little luck out of the game.  In fact these cards represent a player's ability to influence their own move.

 Every time a player lands on, or passes over a Free Will Space they take a card.  These cards show numbers on the front and can be used to move instead of using dice.  They come in very handy as you work to gain tools and remove bad Karma.


If the card is used it must be used before the player rolls the dice.  A player may also combine his Free Will Cards and may move to the count of any or all of his cards.  It may be helpful to place these cards in your area face-up so you can see the numbers available to you.  Used cards are placed on the bottom of the pack.


Lose a Turn Cards:  I became very familiar with this cards as I played.  When you are instructed to lose a turn (either from a card or from the board) take a Lose a Turn Card as a reminder.  They weren't necessarily in the two player game but a big help in the three player game. 

Karmic Majority

Remember mom always telling you that "who you hang out with matters?"  She would feel justified with this next rule in Cosmic Karma.  According to the last game I played I'm not a good person to hang out with, everyone was avoiding landing in my space.

The reason is that whenever a player lands on the same space as another player, they take the karmic majority of the other player.  Karmic majority is the overall quality of a player's karma expressed in positive or negative, by color. 

To calculate the majority the beads, rings, and habits are separated by color.  Each color is added separately.  A ring counts for +1 a bead counts as -1, and a habit stick counts as -1 (habit = -4).  If the larger count is positive the majority is positive, if it is negative the majority is negative.  For a positive majority the player receives a ring, and a bead for a negative majority.  For example, if a player has an orange habit and one orange ring and one green ring, the orange equals -3, and the green equals +1.  Since the -3 is higher a player landing on the same space as that player would be given one orange bead.

The only time a player does not calculate Karmic Majority is in the Spirit Realm.  So now you can also understand why people were trying to avoid me and all my bad Karma.


Playing the Game

Cosmic Karma is a roll and move game (roll two dice, move that number of spaces).  It is not the most complex mechanic and one we are very familiar with.  But the mechanic itself is not as important as the message and the game play.

Basic Game Play:  The player rolls two dice, moves, and takes the items indicated on the space.  The first player to acquire all three master tools, remove all negative Karma, and return to Cosmic Consciousness wins the game.  


1.  First Round:  Players roll the dice and move clockwise around the Earth Realm.  When the "Hanging On" space is reached, they ever the Spirit Realm or return to Cosmic Consciousness.  To return here players must had the three master tools, and now beads or habits.  An exact roll of the dice or an exact number on the Free Will Cards is not necessary.  A player cannot go into Cosmic Conscience as a way to return to Land 1 and avoid the Spirit Realm.

2.  Loosening a Habit:  The Temple of the Sword is the only place where a player can loosen a habit.  A player may enter this temple without a Master Sword but cannot loosen a habit. 

3.  Looping Through Temples:  Looping through either the Temple of the Sword or the Temple of the Torch adjusts the players move by one space and is a strategy that should be considered and used if necessary. 

4.  Past Life Review:  In the "Past Life Review" space the player reflects on their past life.  This space counts as one move.  Note the stop sign on the space:  the player's turn ends regardless of the dice count.

5.  Future Life Planning:  Here, the player plans for his next physical life.  On his next turn he will have three options:  re-enter Land 1 using a roll of the dice or a Free Will Card(s): join any player in Lands 1 through 4, and take that player's karmic majority and the results of that space (but no Free Will cards) or wait one, two or three turns before deciding. 

6.  Arrows:  Arrows, both long and short do not count as spaces.

7.  Pit:  When the player enters the Pit, he takes a bead and his turn is over.  He also takes the Karmic majority of any player in the Pit.

8.  Dharma Wheels:  The Dharma Wheel provides the player with the most direct route to improve his specific karma.  A Dharma Wheel may only be entered through adjoining Free Will Card space and only when the player has a Master Wand.  Each Dharma Wheel counts as one space. 

Winning the Game:

When a player has removed all negative karma, gained all three master tools, and landed on the "Hanging On" Space they are able to enter Cosmic Conscience and win the game.  The first player to enter wins.

My Thoughts

A friend once told me that they never want to play a game unless they can learn something from that game.  As a counter, I explained that in every game there is a lesson.  You learn about yourself, others, and the game itself.  In Cosmic Karma, there are many lessons to learn.  You learn about your own beliefs, question your own actions, and complete what choice you would make.  You also learn that there are consequences for our actions, both good and bad.  You are shown that you and other people can change for the better; and sometimes, for the worse.  You also learn about traditions from around the world - Western psychology, Eastern religions and traditions, and a little about New Thought traditions.

I know that there are some who may have questions about the theme of this game. Personally, I do not believe in reincarnation and a few of the other beliefs used in Cosmic Karma.  But I enjoyed learning and understanding them better.  It didn't change my beliefs; it just made me more knowledgeable about other beliefs.


I found that the basic idea of the game is learning right from wrong, removing the gray areas, and seeing that our actions bring about karma or consequences.  The age limit is set at 13+ and I have to agree with that.  Some of the issues would be difficult for younger children to process.  I would like to see a variant for younger players because I can see the value of this as a therapy or anti-bullying game. 

I had a great time playing this game with my husband and friends.  Yes, it is a roll and move game.  But don't judge it too harshly for that.  Attaining and using the Free Will Cards and strategic use of the Dhrama Wheels takes away some of luck.  Once players have obtained the Master Torch a crafty combination of free will cards and Choice Cards will help them to obtain more good karma and avoid bad karma. This is not a heavy mechanic game in any way, but is a very mature game.  Game play itself is very light, but the theme really does make you think.

I also have to gush over the artwork and components once more.  I love the artwork, the monks are adorable, and the colors draw you in, and make you want to know more.  The board is beautiful and so detailed.  The component quality is top notch.


If you are looking for an easy to learn, easy to play, deep thought game, consider "Cosmic Karma."  Of course, you just might have to step out of your comfort zone, and that's a good thing!


Quick Stats:

Designer:  Linda Look
Artist: Crystal McLaughlin
Publisher:  Cosmic Karma Game Partners LLC
Number of Players: 2-4
Game Length: 30-90 minutes
Website: http://www.cosmickarmagame.com/index.html

Sunday, March 11, 2012

At The Gates of Loyang: A Review

Loyang (Luoyang), in an ancient city located in China's central plain, and one of the four great ancient capitals of China.  It's name comes from its location on the north (yang) side of the Luo River.  "At the Gates of Loyang" takes us back to the time of the Han Dynasty.  A flourishing Loyang became the capital, and for several centuries, the focal point of the empire.

Today travels come to see the White Horse Temple, one of the first Buddist temples in China, the Longmen Grottoes, caves full of statues of Buddha and his followers, and the Guanlin Temples, built to honor the hero and general Guan Yu.


Loyang is also famous for its peonies and the water banquet, Shui Xi.  Shui Xi is a feast of 24 hot and cold dishes cooked in broths, gravies, and juices.  Shui Xi, peonies, and the Longmen Grottoes are considered the three wonders of Loyang.


Object of the Game

Players take on the role of a farmer, wishing to sell and trade their vegetable harvest to the hungry people of Loyang.  Success is measured in movement along the "Path of Prosperity."  The one who moves the furthest will win.  Movement on the path requires cash, and that cash is also needed to invest in the business. So players face many tough choices.


Components / Set-Up

Mom always said to eat your veggies, right?  Well, you will find plenty to choose from in Loyang.  There are a total of 237 wooden veggie tokens.  These tokens include wheat, pumpkins, turnips, cabbages, beans, and leeks.  Yes, technically wheat is a grain, but we'll let that fact slide for now.

The vegetable tokens should be divided and placed to the side to form the supply.  The cash tokens should also be placed to the side with the veggies.  Cash comes in two denominations: the small green tokens worth 1 and larger brown tokens worth 5.

The 70 action cards should be shuffled and placed in the center of the table.  The action cards include 6 common fields, 14 market stalls, 14 regular customers, 14 casual customers, and 22 helpers.

Each player has their own area.  The t-shaped game board is double-sided.  One side is red with Asian designs and a "Path of Prosperity."  The other side shows a more rural scene with a stone "Path of Prosperity," and green fields.  Personally, this is the side I prefer.  Each player receives one game board.  The scoring token is placed on step one of the "Path of Prosperity."  3 wheat, two pumpkins, two turnips, two cabbages, one bean, and one leek are placed in the market stalls of the game board.  One storehouse / cart card is placed with the one side up on the right hand side of the market.

One home field is laid out above the board.  Players are given 8 more fields: 2 sets each of four cards with 3, 4, 5 and 6 spaces.  These field cards are shuffled and laid down to the left of the home field to form the field pile.  Players then are given 10 cash (one five, five ones) and one turn summary card.


The starting player takes the starting player token (large round disk).   Players may chose whomever they wish to be the starting player.


Now, beginning with the starting player and continuing clockwise around the table each player buys one vegetable from their home shop and plants it on their home field.  This means that the vegetable they bought is placed on the home field and all spaces on the field are filled with the same vegetable.  A card shows which vegetables can be planted on it, and no more than two players may plant the same vegetable during the start of the game.


Game Play

There are nine rounds consisting of three phases in the game.

1.  Harvest Phase
2.  Card Phase
3.  Action Phase

One:  Harvest Phase

All players complete the harvest phase at the same time.  First, each player turns over the top field and places it to the right of the other fields.  Then, each player harvests exactly one vegetable from each of their fields.  These are put on the cart cards.  Any vegetables that were left in storage are also put onto the cart.  If the last vegetable is removed from a private field, it is removed from the game.  Common fields are placed on the Action Card discard pile.

Two:  Card Phase

A new draw pile must first be created by shuffling the discard pile and the remaining draw pile.  Each player is dealt four Action Cards. 

Now comes the Distribution Round.  During this round each player will play two cards.  One must come from his hand and one must come from the common "Courtyard."  The starting player is first to place one card from his hand face up on the table, opening the "Courtyard."

On their turn, the player must choose one of two options.  They may not pass.  The first option is to place 1 card from their hand into the Courtyard.  Or, the player may take exactly one card from the Courtyard and one card from his hand.  Both cards are placed face-up in the appropriate part of the play area.  Any cards remaining in their hand are placed face-up in the Courtyard, and the player takes no more actions during the distribution round.  The last player to choose may no longer place cards onto the Courtyard.  They must choose from the available cards.


During a two player game there is a special rule:  at the start of their turn this round, a player may add a card to the Courtyard from the draw pile.  This helps give a wider choice of cards.  This rule also applies when only one player is left and they must immediately choose from the available cards.

Some cards placed call for immediate action.  A placed Regular Customer needs a satisfaction token added; market stalls should be filled with the necessary vegetables, and two cash must be paid for a common field.

Cards remaining in the Courtyard at the end of the Distribution Round are placed on the discard pile.  A new starting player is also chosen.  The last player to take two Action cards receives the large Starting token and is now the starting player.  The second to last player to place two cards is given the smaller starting token and becomes the second player.  


Three: Action Phase


Whoever has the starting player token is the first to perform in the Action Phase.  Here players may take action in any order and as many times as the wish.  They may only "Buy a Two-pack" once.

A.  Sow Vegetables:  Players take one vegetable form their cart, and place it on an empty field.  The field is filled with vegetables of the same type.

B.   Buy Vegetables in the Shop:  The player buys one vegetable from the shop and places it on their cart.  The purchase price is shown in the shop on the darker price tag.  For example, wheat would cost three cash.

C.  Sell Vegetables to the Shop:   If there is free space in the shop the player may sell vegetables.  They are paid the price shown (lighter color).  For wheat, they would gain one cash.  This action can be done during any phase.

D.  Trade Vegetables at a Market Stall:  Market stalls in the player's area are available to use.  The number of bowls shown on the card equals how many vegetables need to be traded.  The traded vegetables are added to the supply and the new vegetable is added to the player's cart.

E.  Play or Discard a Helper:  A player may use a helper's skill or discard the helper without using it.  Some helpers can be played during other phases.  When a helper is used it should immediately be placed on the discard pile.

There are about twenty different helper cards.  Helper cards that include a purple lantern allow player to affect other player's.  Some also offer a choice of actions.  You can only use one.

One example is the "Harvest Helper."  He allows a player to harvest two vegetables from their fields (not home field) that contain four or more vegetables.  Or any card planted receives one additional veggie token. 

F.  Deliver to Regular Customer:  A player may deliver to regular customers in any order.  Each one contains eight empty spaces. The two vegetables shown on the card need to be deliverer over four rounds (two each round).  This starts the same round that the card was played.

A satisfaction marker shows if the customer is happy (purple) or not (red).  A customer is not happy when they do not receive a delivery.  If the player cannot or does not wish to deliver to a regular customer the satisfaction marker is turned to the red side. If the player does not deliver to a customer who marker is already showing red, they must pay a penalty of two cash.

A Regular Customer is delivered to from the bottom to the top.  We like to place the vegetables sold to the customer, on the card, to keep track of how many times the customer has received a delivery.  You could also use the satisfaction marker for this.

Regular customers can also not be discarded until they have received their four deliveries.  And, unfortunately, the customer must receive both vegetables and a player cannot store vegetables on the card. 


G.  Deliver to a Casual Customer:  Casual customer may also receive deliveries in any order.  The Casual Customer is given the three vegetables shown on their card and the player collects payment.  This payment may vary.  If the player has the same number of Regular and Casual Customers, he is given the price shown.  If they have more Casual than Regular Customers the price is reduced by two cash.  If they have fewer Casual than Regular Customers they get a bonus of two cash.  The Casual Customer is immediately discarded after delivery.

H.  Buy a Two-pack:  This action may only be taken once during the action phase.  A Two-pack is two Action cards drawn from the draw pile.  It costs the player the greater the number of Helper Cards or Market Stalls in his "played area."  Cards covered by other action cards do not add to the cost.

The player pays the amount needed and draws two Action Cards.  The player may choose to keep 0, 1 or 2 of these cards.  If the player wants to keep both, the must be placed on top of the other so both cards can be seen.  The player chooses which card to put on top.  The cards are then placed in the correct area (according to the top card).  When the upper card is discarded the bottom card is immediately placed in the correct area.

End of Action Phase

After a player has taken their card phase they must now store vegetables and move the scoring marker, if possible.  The Store House can only hold as many vegetables as shown on the card.  Any additional vegetables must be sold to the shop or lost.  A player can upgrade the Store House for two cash.

Now a player can move along the "Path of Prosperity."  In each round the first step costs one cash.  For each additional space the player wishes to move they must pay the value shown on the space.


Loans

Loans may be taken by player at any time during the game.  A loan gives a player five cash and one loan card.    At the end of the game, player's scoring markers are moved backwards one space for each loan.  A loan can never be repaid.


End of Game

The game ends after nine rounds, after players harvest the last vegetable from their home field.  Players who have taken loans move one space back on the scoring track.  The winner is the one who has progressed the most on the "Path of Prosperity."  If two players are tied, the winner is the person who has the most cash.  If players are still tied the winner is whoever has the most vegetables left in the Storehouses and fields. 

My Thoughts

Loyang is my favorite game from the Harvest Trilogy (Agricola, Le Havre), and one of my "Top 10" games.  This surprises even me, for a few reasons.  The first reason is that the game is more about math, than about the city of Loyang and harvesting vegetables.


I love the artwork and design of the game.  Ancient China is a fascinating subject to me.  My reading list has been full of novels by Pearl Buck, Linda See, and other authors who bring ancient and modern China to life.  (I recommend "Snow Flower and the Secret Fan" to any lover of this subject.) Truthfully, Loyang could have just as easily been called "Lancaster" and been set in Pennsylvania Amish country.  The theme isn't that strong.  For me, and this game, that doesn't matter.

Players needs to always be thinking ahead and keeping a budget in Loyang.  It will be very difficult to do well otherwise.  Usually I'm not that best at thinking ahead and games that involve this forward thought frustrate me.  This feeling is rare in Loyang.  I know I have to watch my area and my opponents' areas, think ahead to what cards I want, what vegetables I need to plant, if I'm almost out of a vegetable, and so forth.  It can be a lot to keep track of, but it still seems possible.  I think this can be attributed to the organization of the player area.  Cards are kept in a certain spot and not intermixed.  A quick glance tells a player how many fields, customers and goods helpers they have.


Loyang is a great two player and solo game.  Going beyond two players may increase the downtime between turns. This downtime has turned some people off of Loyang.  I find it helpful to take a moment and think through what I need and want to do and how I can accomplish that.  Plus, you can always watch your opponent.  There isn't a lot of player interaction so this can be a time to watch your opponents strategy. 

There is also a element of luck in Loyang.  Cards come out randomly and you don't always get the card you need.  Once I had a hand of all regular customers who wanted vegetables I didn't have.  Because I  had to take one from my hand I ended up with a customer I didn't want and couldn't satisfy.  To avoid losing cash I had to change my strategy.

The solo version is also enjoyable.  This is the first game I have played solo.  At the urging of my husband, I reluctantly tried.  As usual, he was right, and I did indeed enjoy the game.  It offered a interesting challenge aside from the two player version.  One row of the courtyard is free while you need to pay cash from cards from the other rows.  This offers another difficult choice since it seemed the free cards were rarely cards I needed or desired and they were never cleared.  I still ended up with a decent score (17) and a better understanding of the game.  So, overall a great game, but not for everyone.


Quick Stats:

Designer:  Uwe Rosenberg
Artist: Klemens Franz
Publishers: Z-Mann Games, 999 Games, Hall Games, Hobby Japan, Intrafin Games
Number of Players: 1-4
Game Length: 120 minutes